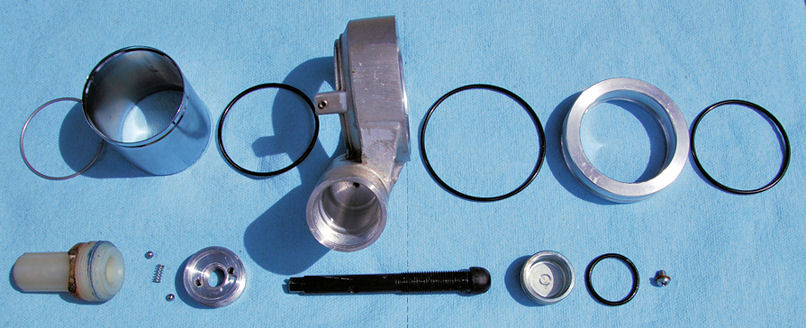
Rebuilding Your Hydraulic Preload Adjuster
Here is a little tutorial on rebuilding the hydraulic preload adjuster on several Triumph motorcycles.
(1) Remove small screw on back of cylinder and let oil drain from that hole.
(2) Using a rag or something soft to absorb the impact of the piston use about 30 psi air pressure and a rubber tipped air gun and put the rubber tip against the screw hole and apply a little air. The piston will pop out and allow you to remove the o-rings and the piston from the sleeve. (Warning some oil will come out as well so have some rags handy or you can even cover the piston end with a rag and let it soak up the fluid)
(3) The plastic nose piece and the aluminum nut under the nose piece are both left hand thread. Remove the plastic nose piece using some pliers like the Knipex smooth jaw. (A spring and two ball bearings will pop out when removing the nose piece so make sure it is over a pan or some soft towel to capture the spring and ball bearings).
(3a) Apply a little heat to the housing where the aluminum nut is and using a set of 90 degree medium sized snap ring pliers you can reach down inside the cavity and remove the inner aluminum nut using the two holes to the sides of the center adjuster shaft.
(4) After the nut is out take a 16D nail and grind the end flat, Now insert that through the small screw hole and tap lightly until the piston comes out.
(5) You should now have the empty housing for the adjuster, Take some scotchbrite and polish the bore that the piston is in. If after polishing you still see pitting or erosion the piston may not seal and you will need to find another preload adjuster.
(6) Clean all the components and set aside, Take a small bit of seal grease and coat the inside of the cylinder with it. Make sure piston floats inside the bore with the o-ring removed. If that is good then install o-ring and push the piston all the way in.
(7) Install threaded adjuster rod and aluminum nut back into bore using a small amount of loctite (Blue that is). Just snug it up, No reason to strip anything out. Put some grease around the two holes to help seal the inner bore from this issue again.
(8) Put the spring back in the adjuster shaft and using a touch of grease put it on the ball bearings so they will retain themselves when installing the nose piece. Install plastic nose piece using a small amount of loctite on that as well (Once again the Blue stuff). Just snug that up as well.
(9) Make sure adjuster is backed all the way out. Now using the 16D nail again tap the piston until is seats on the adjuster screw.
(10) Now clamp (lightly) the adjuster with the open piston side up and in a horizontal plane, Assemble piston and install sleeve back into housing (Chrome sleeve that is). Install screw just by a couple of threads. Pour some suspension fluid (lighter is better) into the open piston cavity right the the top. Now with the piston and o-rings together slide over the chrome sleeve and push down gently to push the oil into the cylinder. You will feel some resistance as the air tries to escape out between the threads of the screw.
(11) Once that is done unclamp the adjuster and reclamp so the small screw end is vertical. Remove screw and add more fluid to fill cylinder, Once cylinder is full to top of threads re-install screw and snug that up.
(12) If you have a press place the spring on the piece of steel and using something soft to sit on the top of the chrome sleeve of the adjuster and put a load on it, Then tighten the adjuster all the way and then back it out and pay attention to how many clicks you have before the adjuster starts pressing down on the spring. You should have about 2 clicks before it starts moving the spring. This will insure that the adjuster is not putting any pressure on the spring while backed out fully and that you get a usable amount if adjustment from the adjuster.
(13) Grab a beer and enjoy!!
(14) This all assumes that you have the tools to get the spring and adjuster off of the shock in the first place. This is going off of memory so if you run into a problem let me know and I will try and clear it up for you. Also as a side note, If you have more then two clicks before the adjuster starts putting pressure on the spring either the black spacer ring is not installed or it does not have enough fluid in it. Just going to throw the dis-assembled preload adjuster image up in here so you can see what it looks disassembled.

